Goals #
In simple terms, goals are key actions that users take on your website that you decide to track. These actions can vary depending on the type of business, but some common examples are:
- Making a purchase
- Filling out a contact form
- Downloading a file
- Signing up for a newsletter
The “Goals” section of Overtracking allows you to monitor and analyze the key actions users perform on your website. Digital analytics tools track generic metrics, but each business may need to track specific metrics, which is where goals come in.
Unlike other tools that require programming knowledge to set up these goals, Overtracking has developed a goal builder that allows you to configure them with just a few clicks.
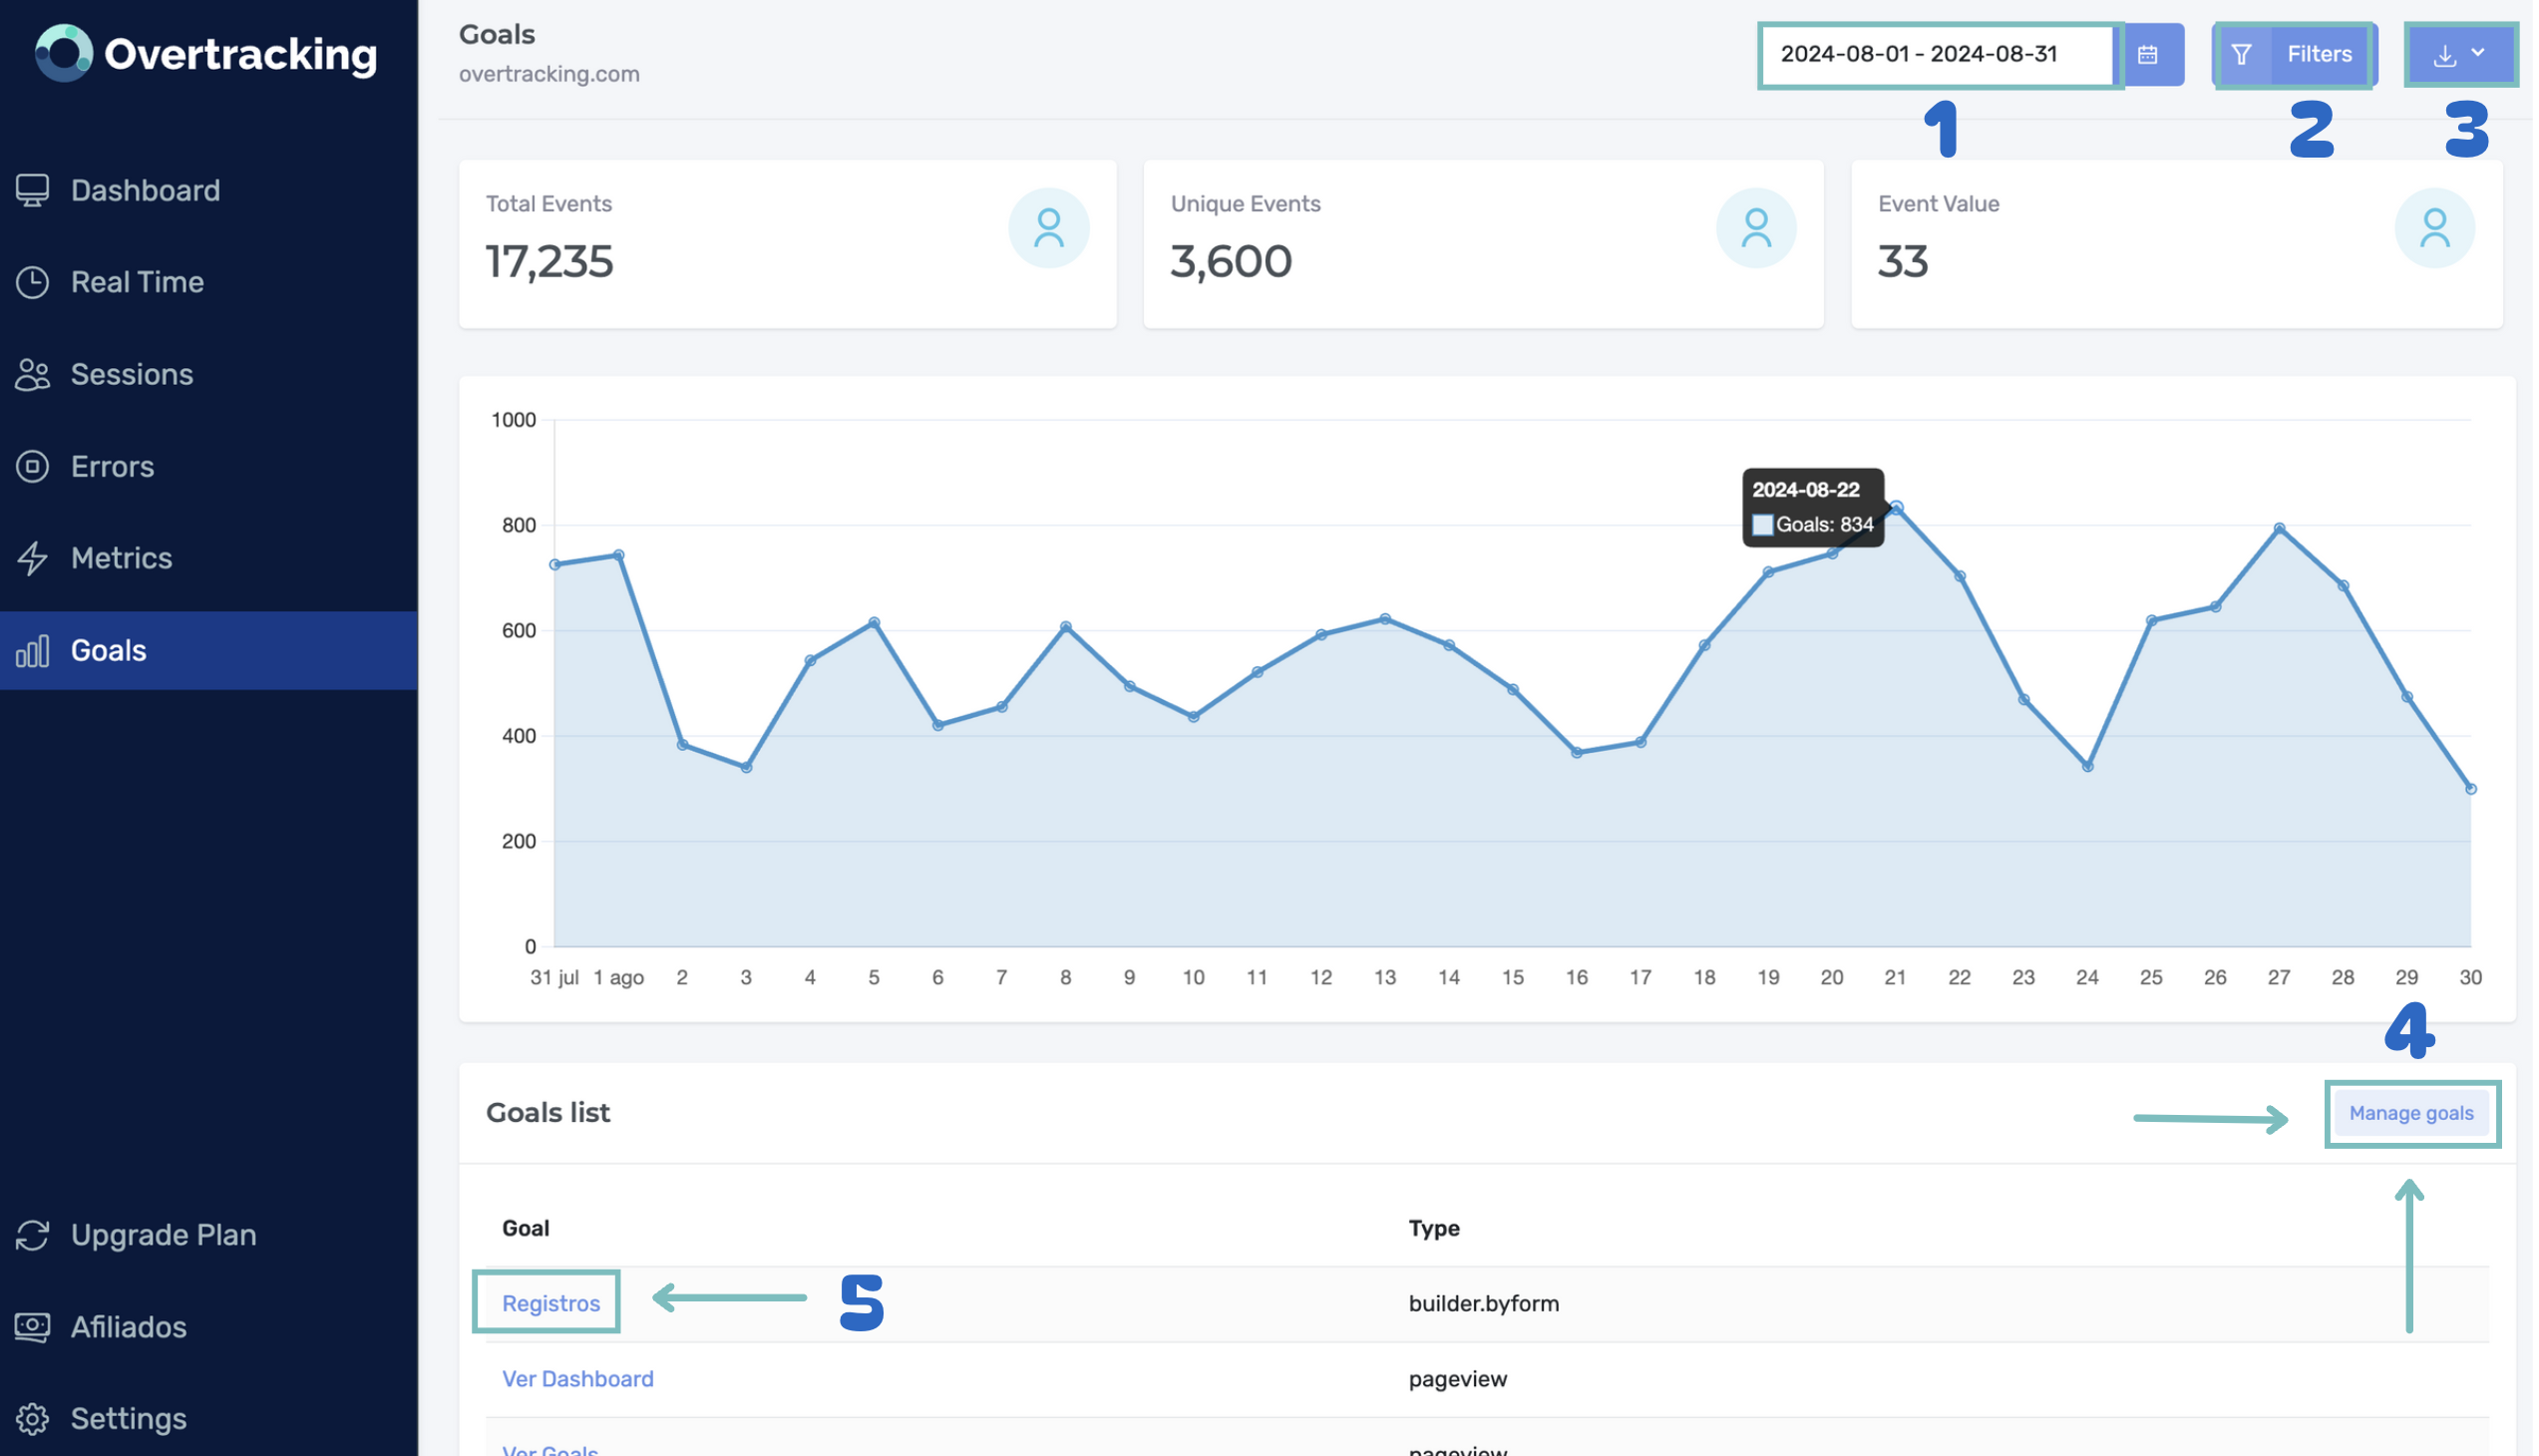
- Select the desired period
- Add a filter
- Export data in .csv or .pdf
- Add and edit goals
- Goal detail view
Key metrics #
- Total Events: The total number of times a goal has been completed.
- Unique Events: The number of unique users who have completed a goal.
- Event Value: The monetary value associated with completing a goal.
Event graph by day #
This graph shows the number of events per day completed by users based on the set goals. It allows you to visualize the evolution of user behavior over time. Remember that you can change the viewing period (1) by clicking on the date in the top-right corner or add filters (2).
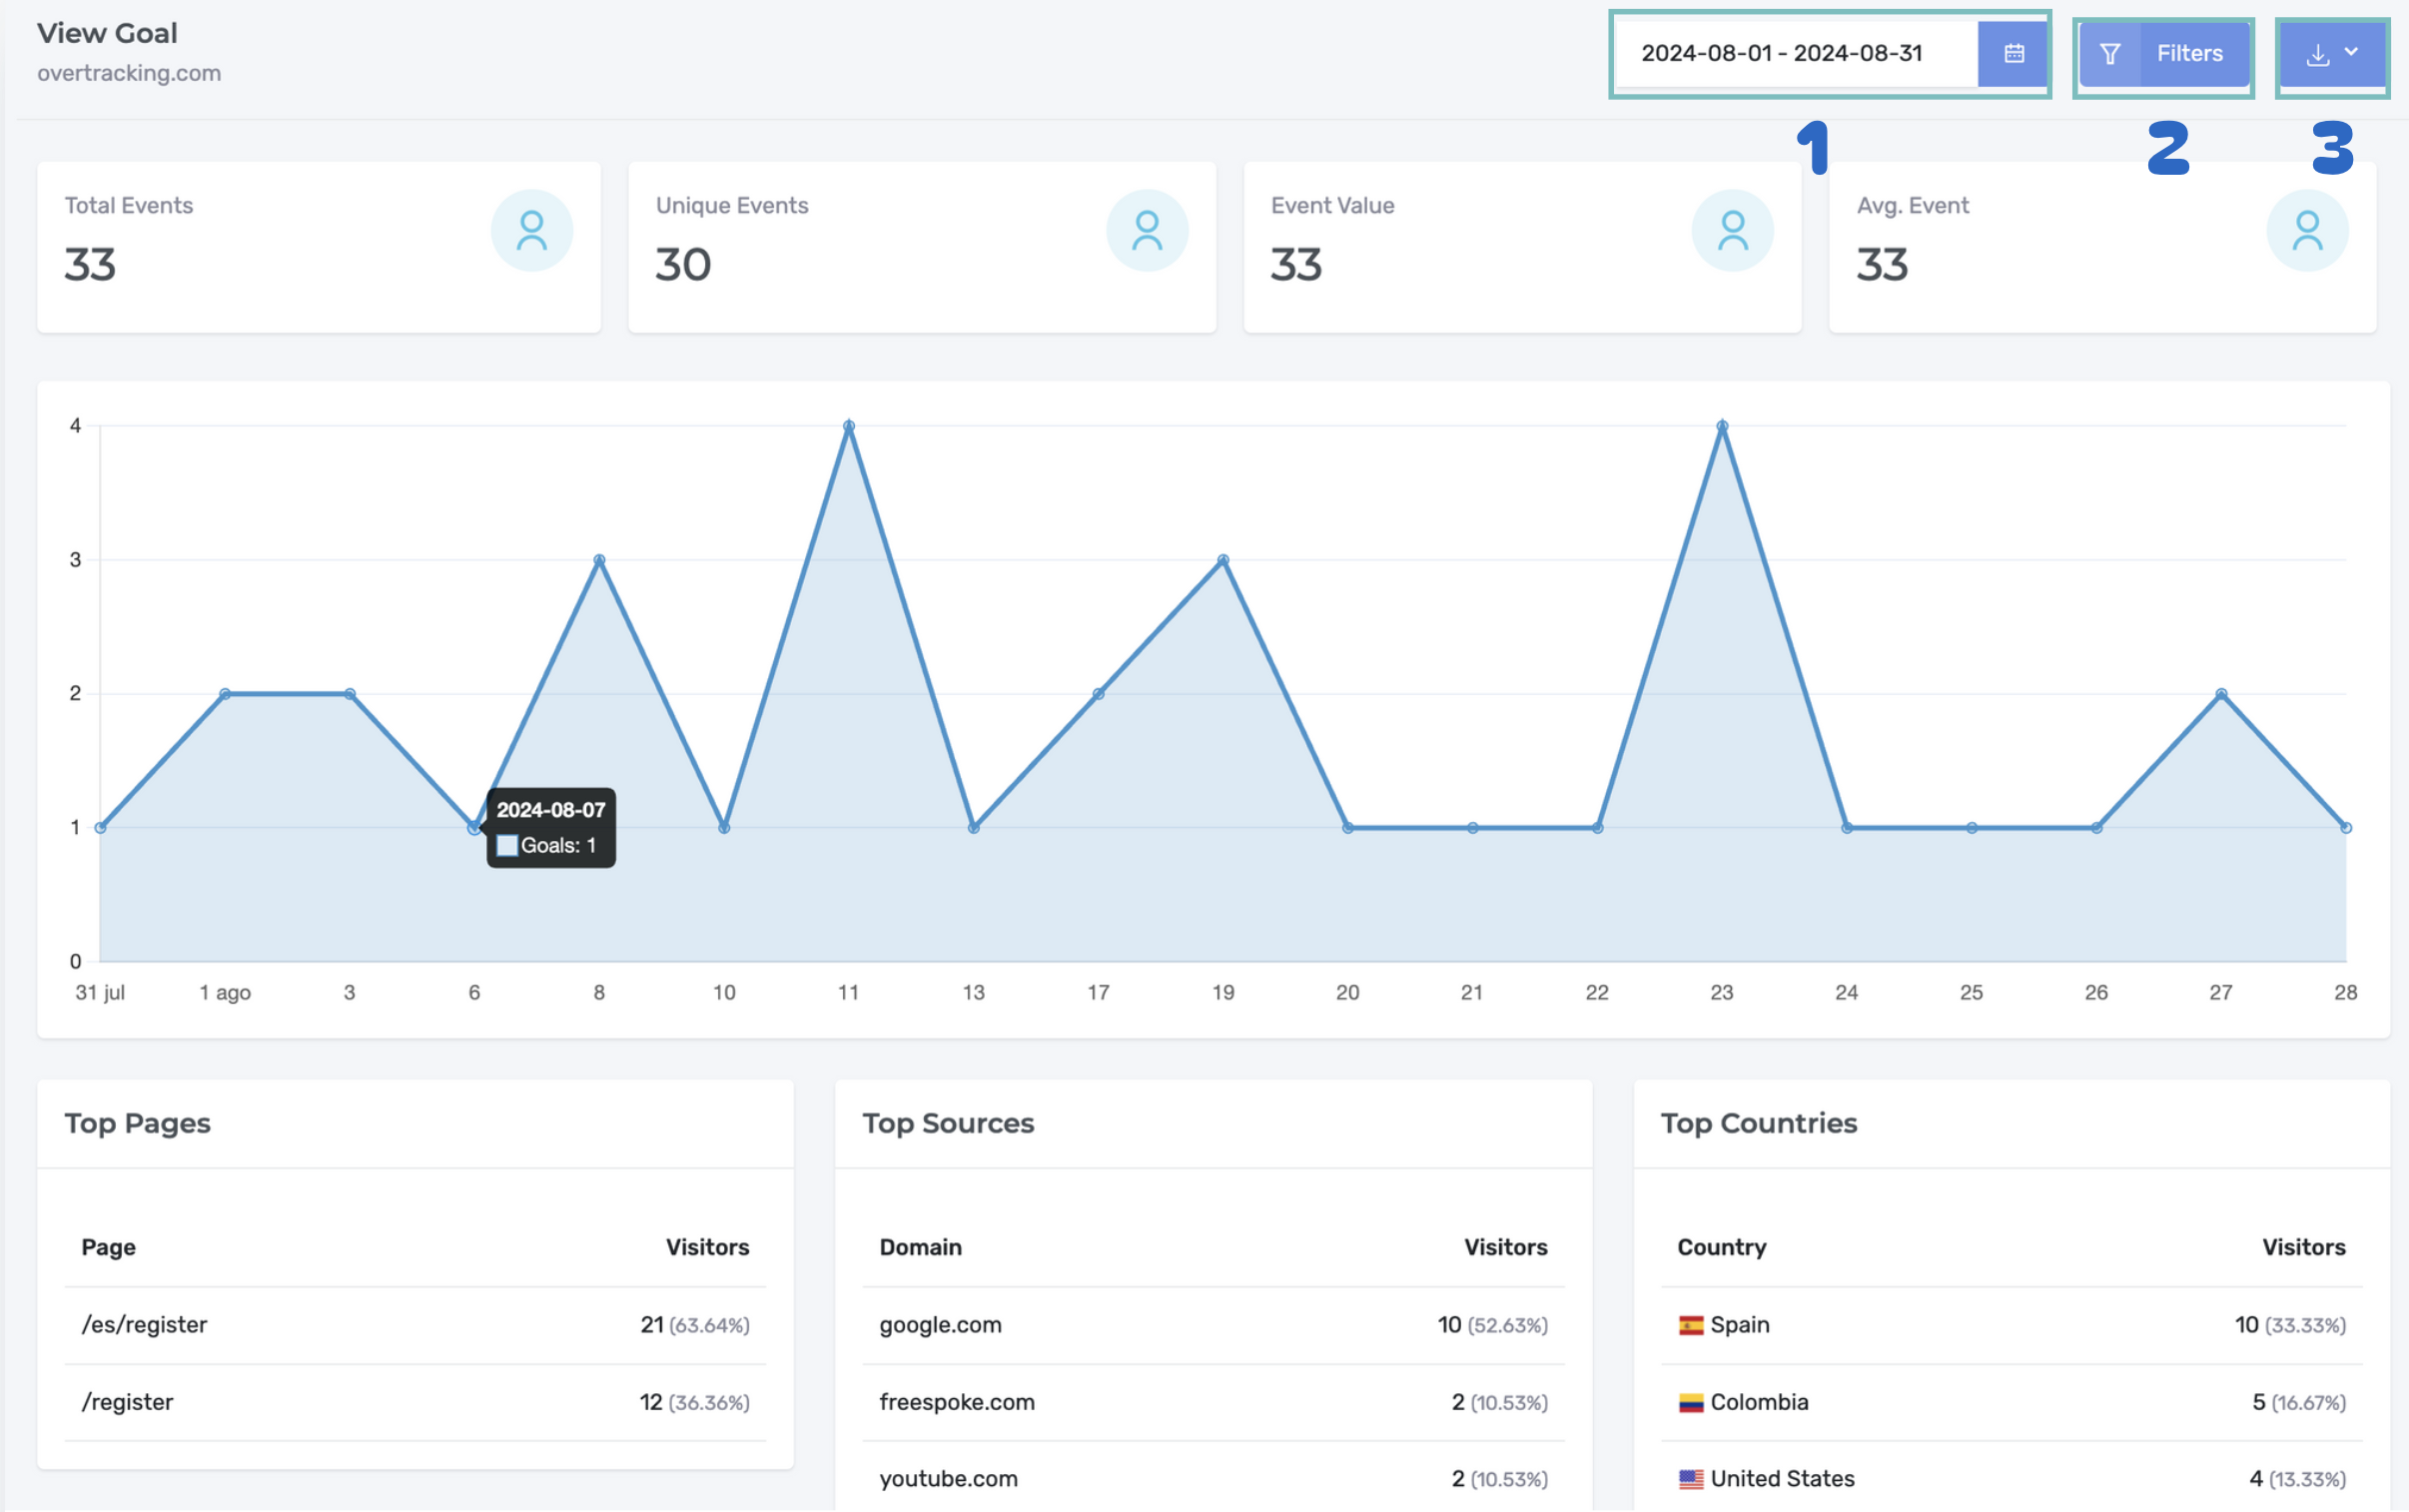
Goal Detail View #
To view detailed data for a goal, click on the goal you want to view in the goals list (5).
A dashboard with the goal’s details will appear, showing pages, sources, countries, operating systems, devices, browsers, screen resolutions, browser languages, and UTM parameters.
As with other dashboards in the tool, you can use the features to customize the period (1), add filters (2), or download data in .csv and .pdf format (3).
How to add or edit a Goal #
To add a new goal or edit an existing one, click the “Manage Goals” button (4) that appears in the goals list on the main page. You will find three different methods for creating goals:
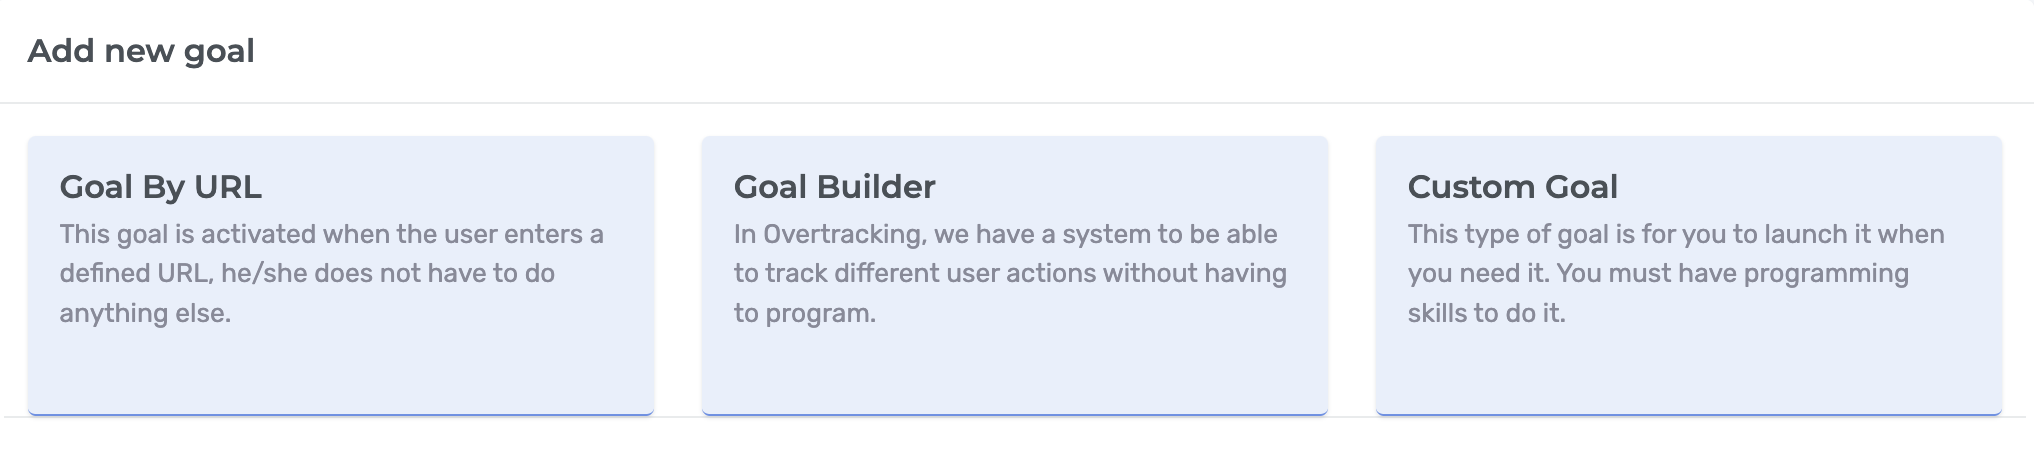
- URL Goal: Monitors visits to a specific URL.
- Goal Using the Builder: Overtracking offers a goal builder that allows you to create goals easily without editing code. You can create goals for different types of actions, such as link clicks, button clicks, form submissions, etc.
- Custom Goal with Code: If you need to create a more complex goal, you can do so using JavaScript.
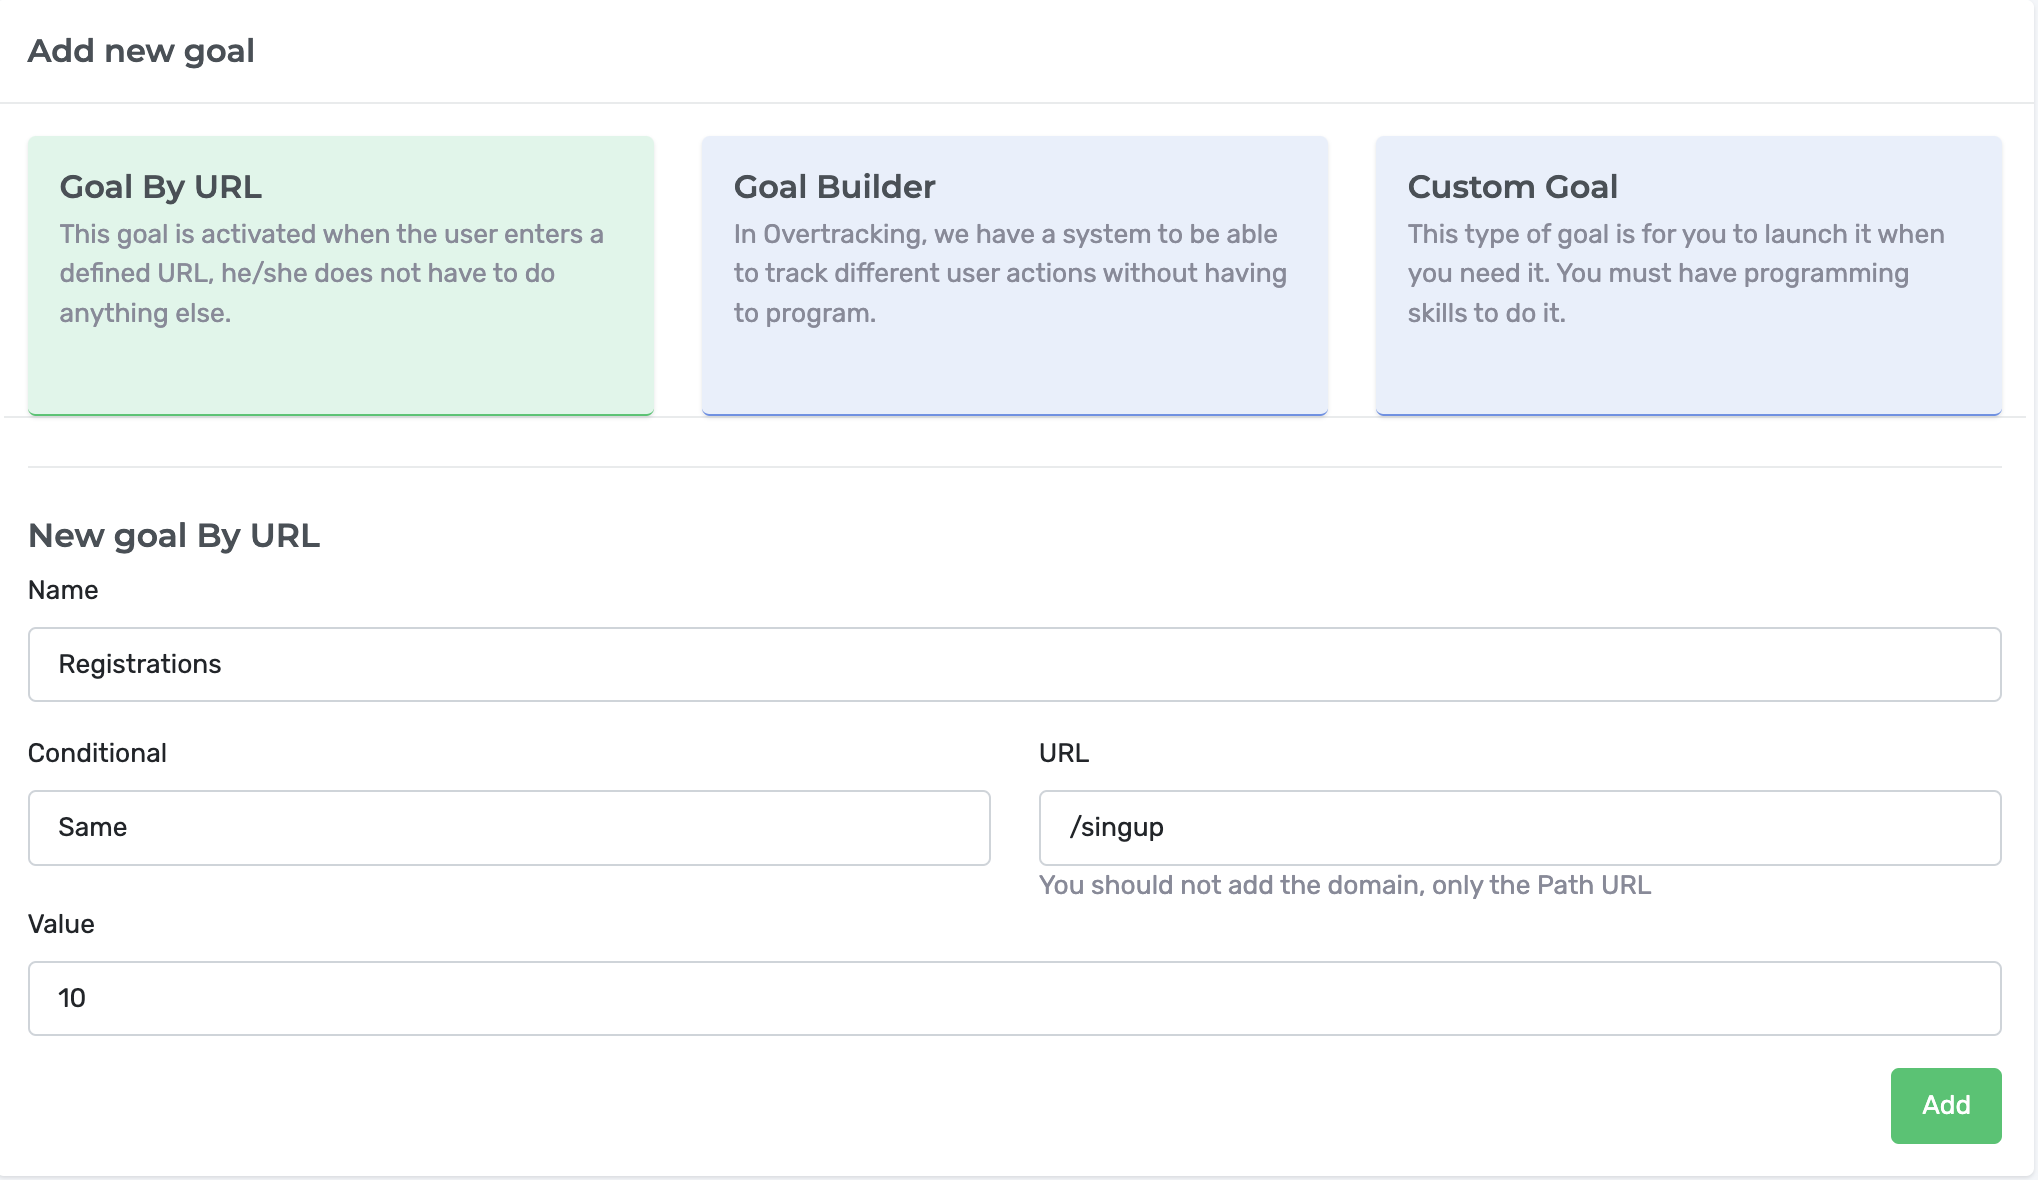
Add a Goal by URL #
- Choose a name that helps you recognize the goal and enter the URL you want to monitor. Remember not to add the domain, only the path. If the URL you want to monitor is www.overtracking.com/signup, you should only write “/signup”.
- Select a condition (equals, starts with, ends with, contains).
- Assign a monetary value to the goal (this step is optional).
- Click “Add”.
Add a Goal using the builder #
The Overtracking goal builder allows you to create goals intuitively without editing code. This feature sets Overtracking apart from other web analytics tools. With this option, you can measure complex events across the web without adding code.

Link
- Name: Enter a descriptive name for the goal, e.g., “Click on ‘Buy Now’ link”.
- Condition: Select the condition that must be met for the goal to activate. Available options are:
- Equals: The URL must match exactly with the specified URL.
- Starts with: The URL must start with the specified URL.
- Ends with: The URL must end with the specified URL.
- Contains: The URL must contain the specified URL.
- URL: Enter the URL you want to monitor.
- Value (optional): Assign a monetary value to the goal.
Button #
- Name: Enter a descriptive name for the goal, e.g., “Click on ‘Submit’ button”.
- Condition: Select the condition that must be met for the goal to activate. Available options are:
- Equals: The button text must match exactly with the specified text.
- Starts with: The button text must start with the specified text.
- Ends with: The button text must end with the specified text.
- Contains: The button text must contain the specified text.
- Button: Add the text of the button you want to measure.
- Value (optional): Assign a monetary value to the goal.
Clicks #
- Name: Enter a descriptive name for the goal, e.g., “Click anywhere on the page”.
- Selector: Select the element that must be clicked for the goal to activate. You can use the CSS selector to identify the element*. If you’re unsure how to do this, we’ll explain it at the end of this tutorial.
- Value (optional): Assign a monetary value to the goal.
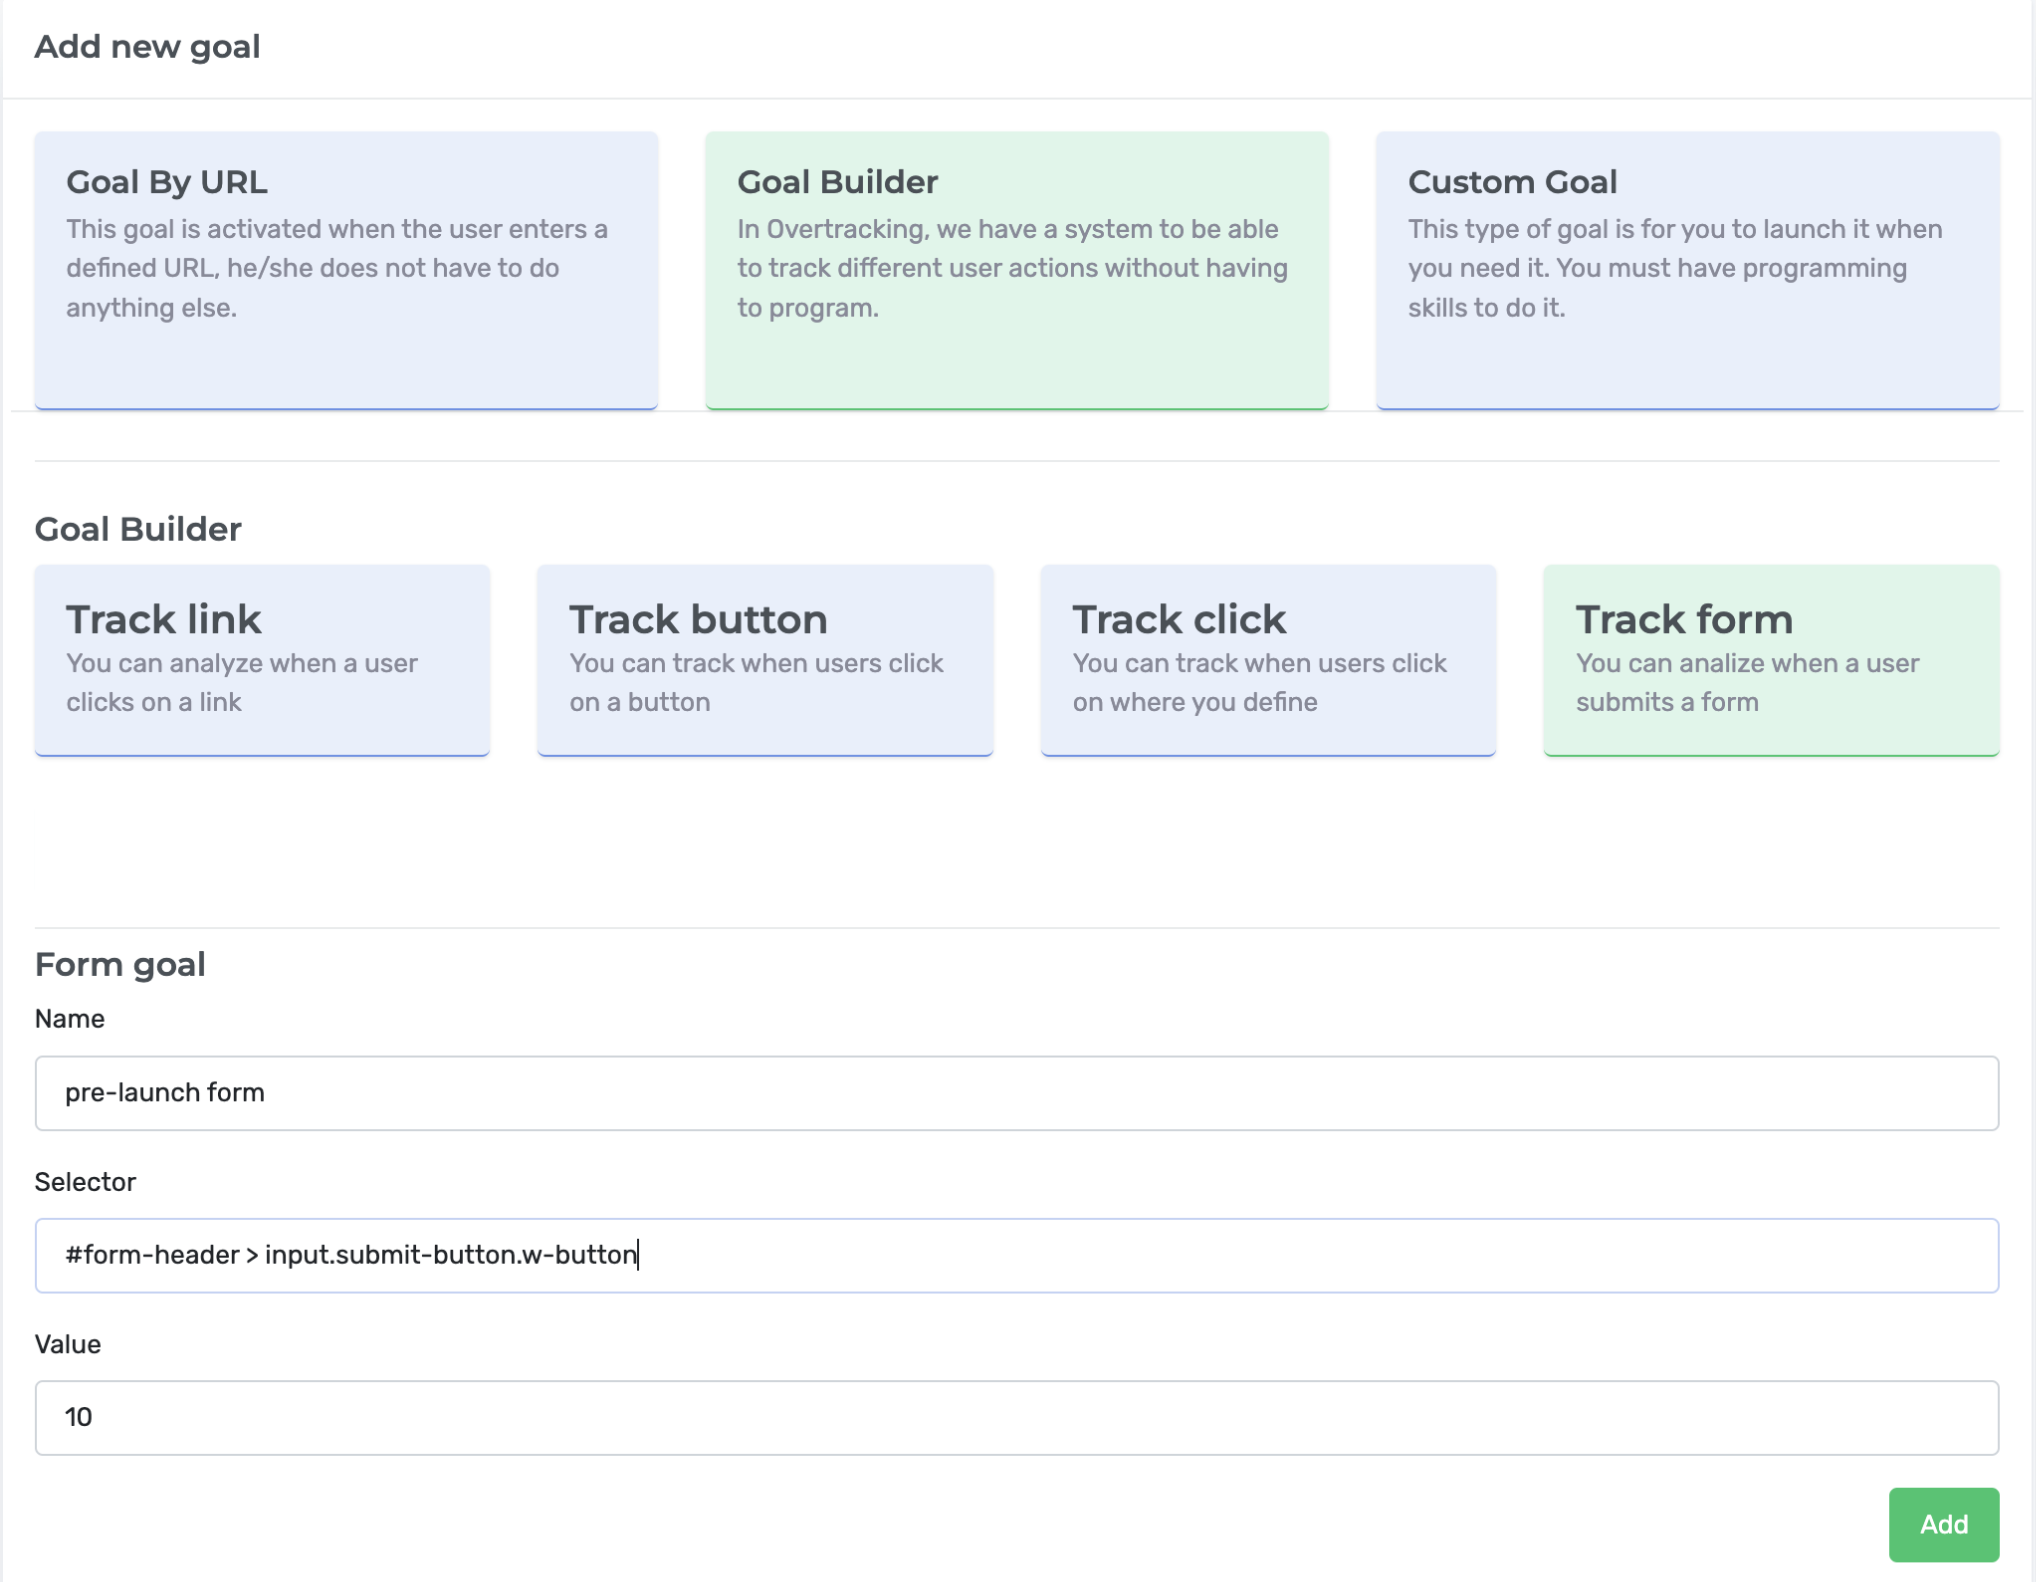
Form #
- Name: Enter a descriptive name for the goal, e.g., “Contact form submission”.
- Selector: Select the form you want to monitor. You can use the CSS selector to identify the form*.
- Value (optional): Assign a monetary value to the goal.
How to Use the “CSS Selector” Tool #
To measure forms and clicks, you will only need to learn how to use the element inspector, a window you can open in your browser to view a webpage’s code.
- Open your browser’s developer tools.
- In Chrome, press Ctrl+Shift+I (Windows) or ⌘+⌥+I (Mac).
- In Firefox, press Ctrl+Shift+K (Windows) or ⌘+⌥+K (Mac).
- You can also right-click and select “Inspect”.
- Select the “Elements” tab.

- Click on the CSS selector icon (1).
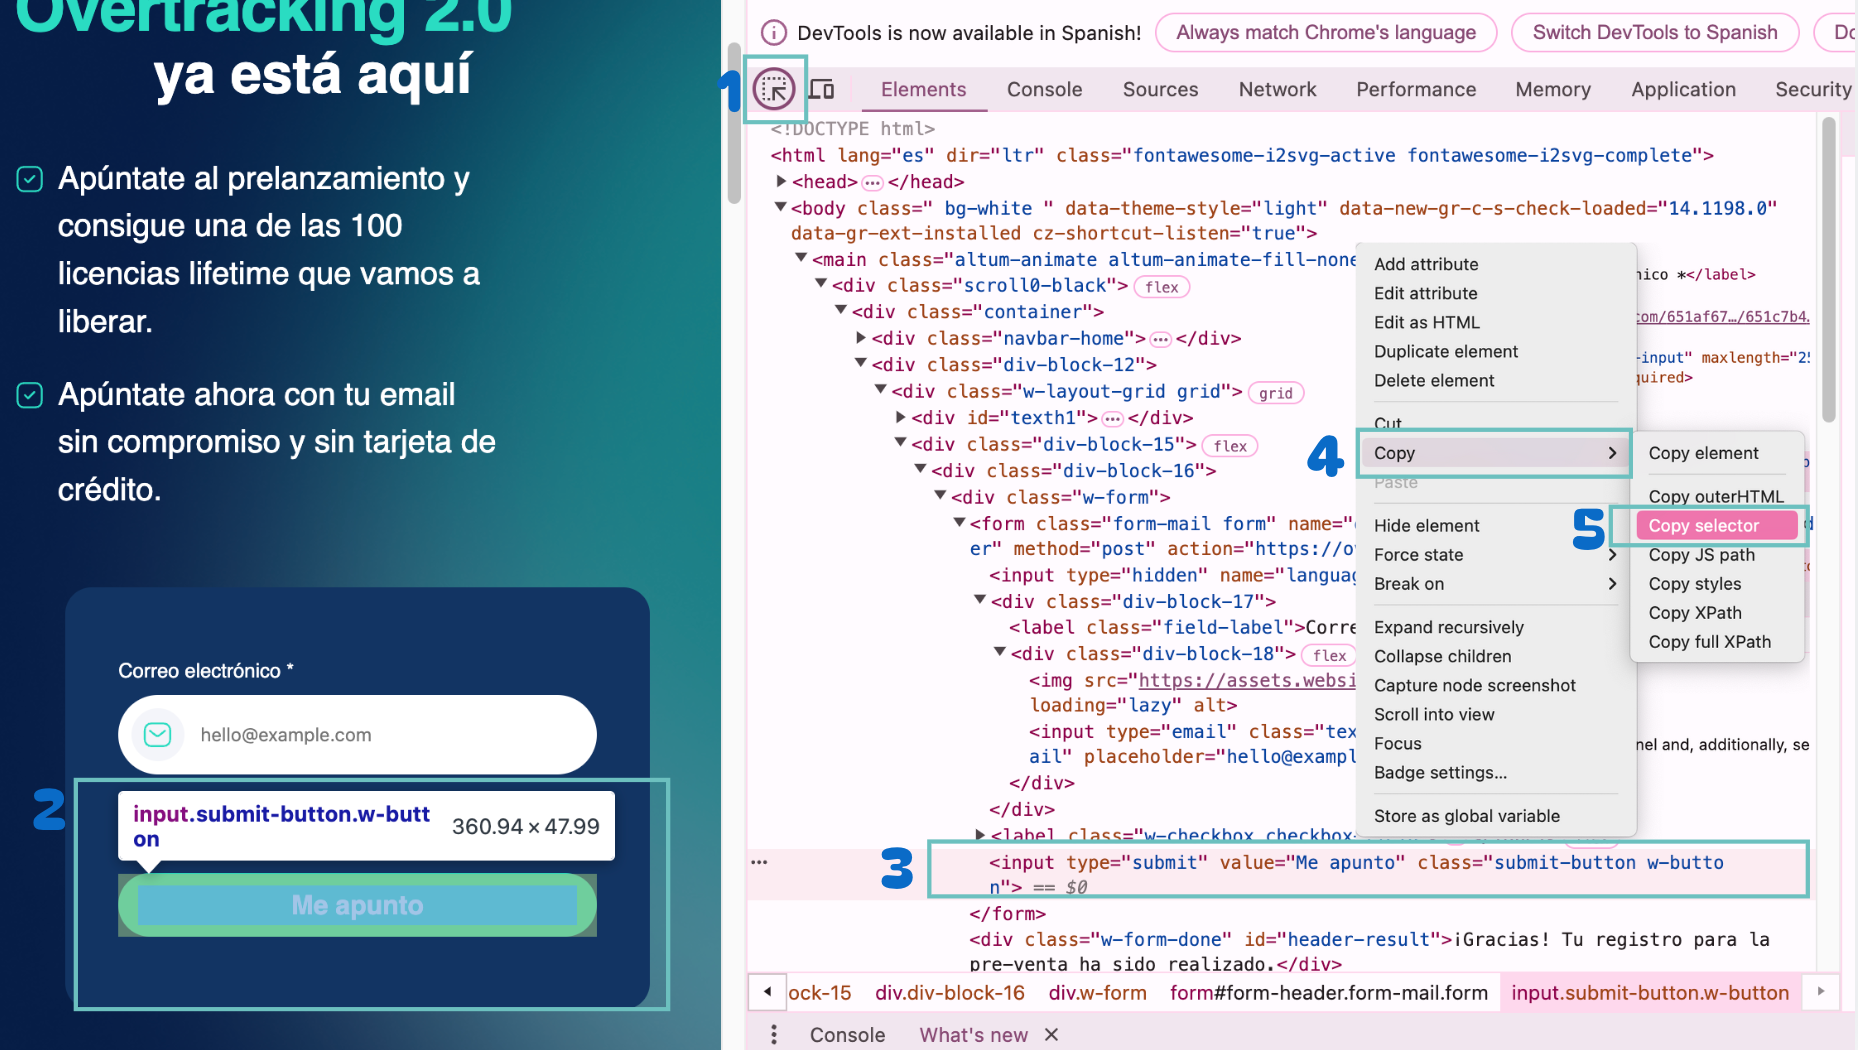
- Move the cursor over the webpage until you find the point where you want to track clicks or the form (2).
- Right-click on the highlighted code area (3), select “Copy” (3), then choose “Copy selector”.
- Paste the CSS selector into the “Selector” field in the goal builder.
Add a custom Goal with code #
To use this section, you must be able to handle and edit code. Create your custom goal, choose a name to recognize it in Overtracking, enter the key, and click save.